CONTENTS:
1. The Hardware
2. Connecting the Castle link to your esc & PC
3. About Tab
4. Basic tab
5. Cutoff Voltage
6. Auto-Lipo Volts/Cell
7. Reverse Type
8. Motor Direction
9. Motor Type
10. Power-On Warning Beep
11. Brake Amount
12. Drag Brake
13. Power tab
14. Max Reverse Power
15. Punch control
16. Torque Limit
17. Advanced Tab
18. Arming Time
19. Throttle Dead Band
20. Start Power
21. Throttle Curve
22. Brake Curve
23. Save-Print
24. Software Tab
1. The Hardware
The hardware consists of a USB to USB mini cable as well as a small PCB mainboard that you connect the ESC to. This board has been released in a couple of varieties, one with and one without servo wires connected, and in a couple different colours too. If you have the one without the servo wires, make sure you connect it correctly.
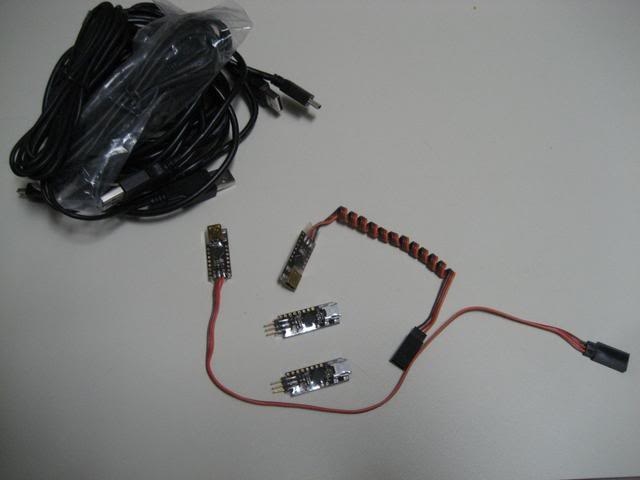
The board has markings for + - and what looks like a U. The - is always the darkest wire or black, the middle or red is always + and the last wire is for data:
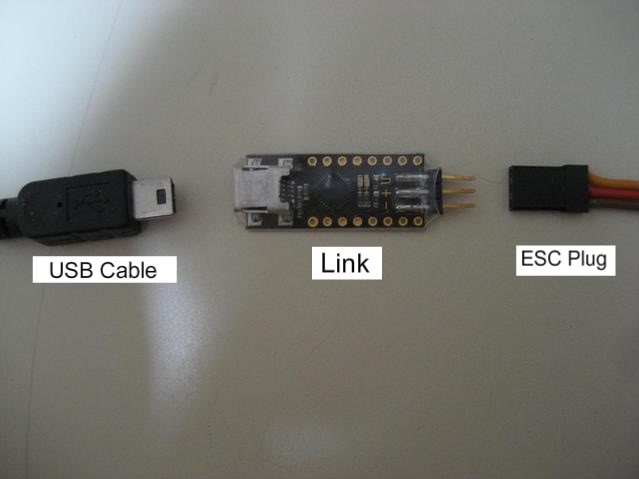
2. Connecting the CastleLink to your esc & PC
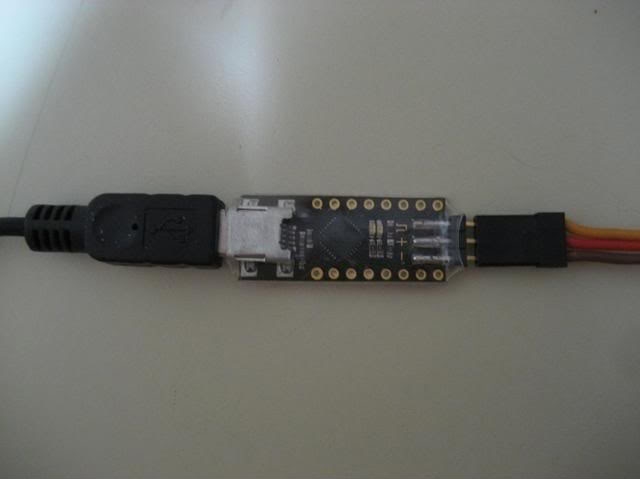
Connect the servo wire coming from the Mamba Monster ESC to one side and plug the usb mini into the other:
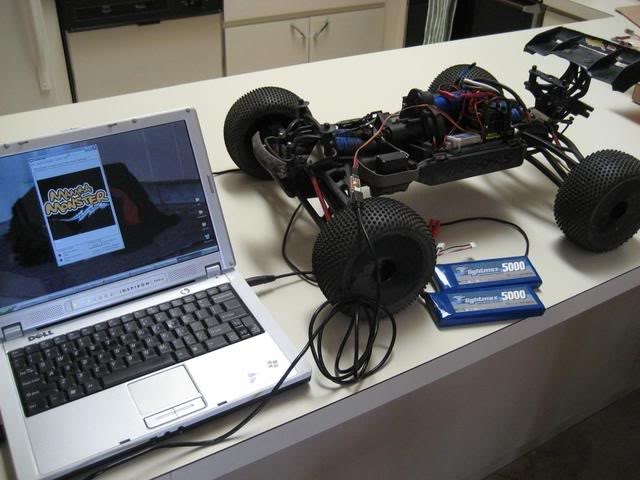
You then plug the other end of the USB cable into your computer. You will have to open the receiver box in order to connect the MMM's rx lead to the Castlelink- you can avoid this by using a servo Y-splitter plugged into your throttle channel & running the other leg out of the rx box; assuming you have an RX box that is. You can trace the rx lead from the esc to the rx to make certain you are unplugging the correct one before connecting it to the castlelink.
That's it for hardware connection, nice and simple. You should have downloaded & installed the Castlelink PC software and updated it to the latest version available from the CastleCreations website, click HERE for the latest version. In most cases you do not need the main batteries connected when altering ESC settings.
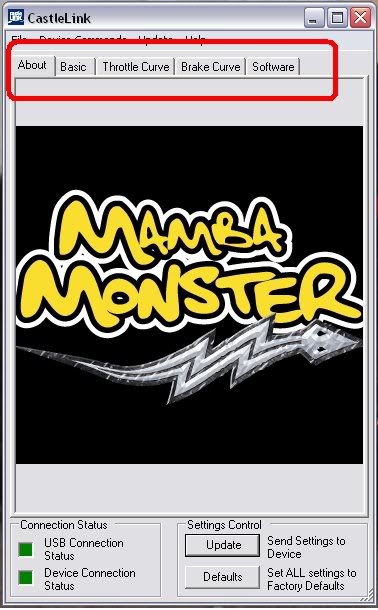
3. About Tab
Upon Connecting the ESC to the CastleLink, and the CastleLink to your PC you will be greeted with this screen- note that both the 'USB connection status' and 'Device connection status' are solid green to indicate that both the ESC & CastleLink have a proper connection to the PC and that there are no software issues- see the CastleCreations website for troubleshooting help.
If you are only making alterations to the ESC settings then proceed to the Basic tab, or if you wish to change the Firmware version of the ESC then head to the Software tab. To enable the changes you have made to settings or to load the new firmware version, make sure you click the 'Update' button that is present on each page.
NB: sometimes you may receive an error message after the update appears to have gone through, simply unplug and reconnect the Castlelink, click okay on the message and check to see if the update was successful ( the new settings and firmware should be in place under each tab ).
4. Basic tab
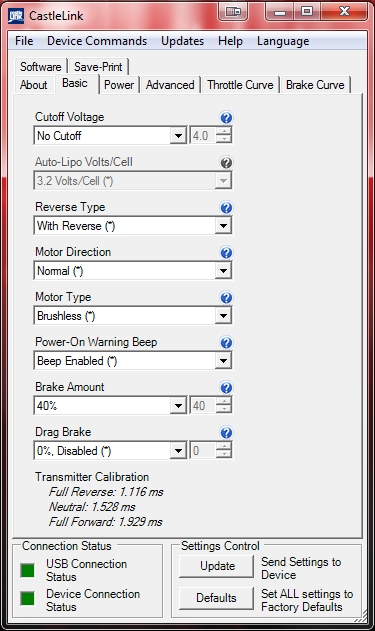
After the initial 'About' Tab, you will begin with the 'Basic' Tab which is where the majority of ESC settings can be adjusted. The appearance of the Basic Tab and the menus in general will alter slightly depending on which ESC Firmware version is selected and loaded- later Firmware versions have extra menus and features which can be adjusted.
5. Cutoff Voltage
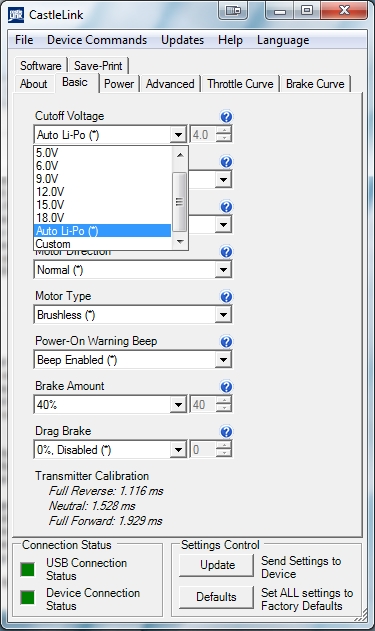
The cut off voltage is a setting used to protect Lithium Polymer batteries from being over discharged, which will damage the battery (less than 3v per cell as a general rule).
If you are using NiMh or NiCd batteries you do not need a cut of voltage to protect the batteries, as these types of batteries show drastic decrease in performance before they are discharged to zero; use the 'No cutoff' setting for nimh & Nicad batteries.
Using the auto lipo setting will cause the ESC to estimate how many cell you have connected in series and set an appropriate LVC setting, which will be 3.2v ( default ) multiplied by the number of cells. You can also set the LVC voltage manually in which case 3.0v per cell is used (6v = 2s, 9v = 3s, 12v = 4s lipo, 15v = 5s lipo, 18v = 6s lipo ). There is also the Custom setting where you can set the total cutoff voltage totally manually- it is recommended to use a multiple of 3.2-3.4v per cell depending on how many cells there are in series altogether.
NB: It is strongly recommended to use the Auto lipo setting or a minimum of 3.2v per cell regardless of cell quality in order to prolong battery lifespan.
6. Auto-Lipo Volts/Cell
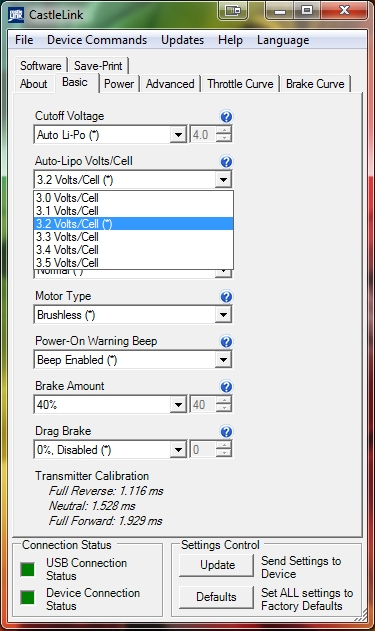
The Auto lipo setting, when selected, allows the user to alter the voltage-per-cell figure the ESC uses to determine the total voltage at which is will shut down. Default setting is 3.2v per cell, so for a 4s lipo the ESC will shut down when the total voltage drops to 12.8v, or if 3.4v per cell is used it will shut down at 13.6v etc etc. Under most circumstances 3.2v is perfectly fine and recommended, unless you are of the paranoid persuasion in which case 3.3-3.4v per cell is fine too- runtime will be slightly shorter however.
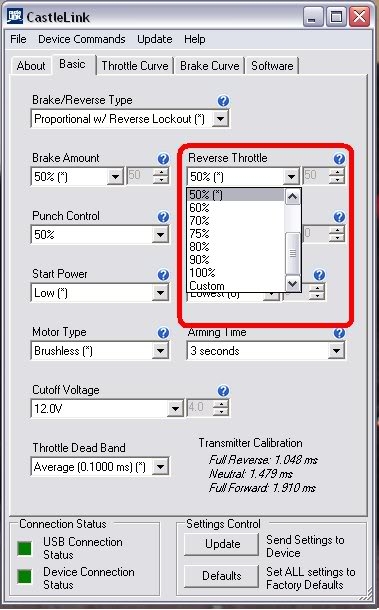
7. Reverse Type
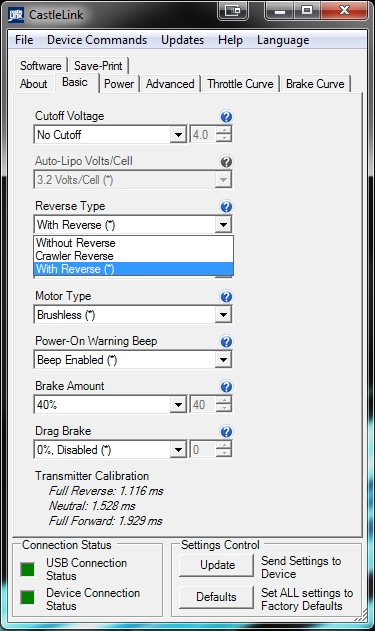
This setting allows you to disable reverse throttle, or to switch it to Crawler type- explanations are found by clicking the small blue '?' circles by each setting. The default setting is best for normal use & for the best control- you will need to release the brakes for 2 seconds before you can engage reverse.
8. Motor Direction
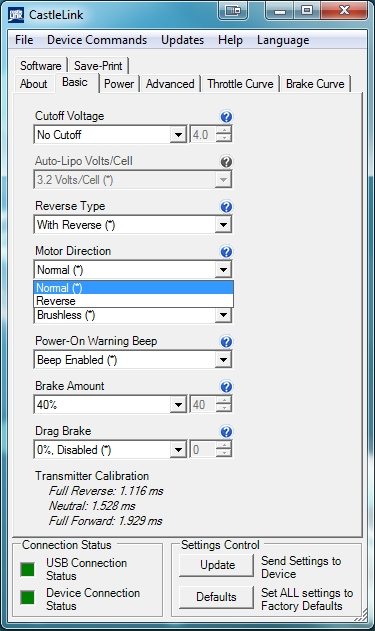
This setting is used to reverse the direction the motor will spin via software, rather than having to swap around the motor wires manually to make the motor spin in the opposite direction when throttle is applied. This is handy if you directly soldered the wires from the esc to the motor or vice-versa.
9. Motor Type
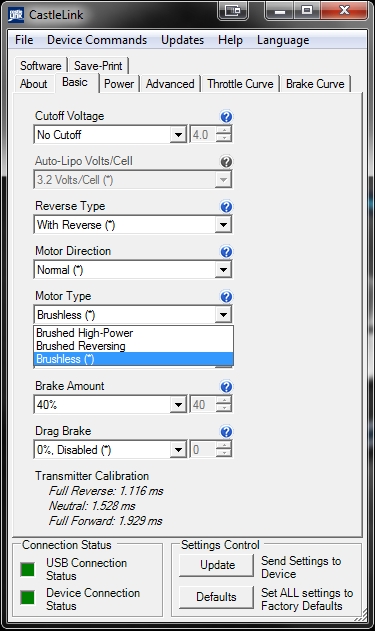
This setting determines what motor type the controller will run, and in what configuration. Your options are the following:
# Brushed High-Power
Use this setting to run a brushed motor in forward and brake only mode for racing- there is a special wiring sequence for this mode, see the manual for details.
# Brushed Reversing
Use this setting to run any brushed motor, and have access to reverse.
# Brushless
Use this setting to run any brushless motor.
10. Power-On Warning Beep
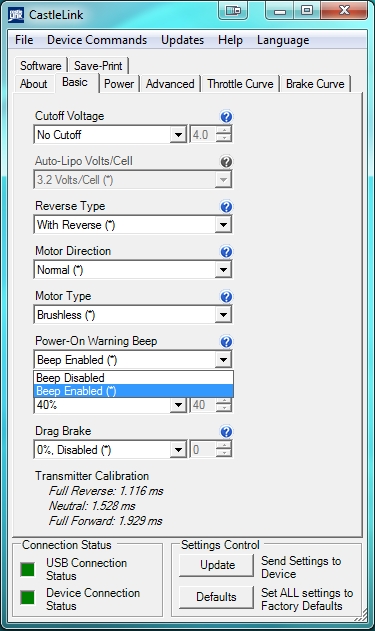
When this feature is enabled the Motor ( via pulsed current through the phases ) will emit a beep every 20 seconds to warn the user that the ESC is still turned on ( when the transmitter/ throttle is at neutral ). This is useful as it reminds a careless user that they have left their esc turned on with the batteries connected; always unplug your batteries from the ESC when you have finished using it ( there is still a small current drain caused by the capacitors which can drain batteries until they are damaged, even if the ESC is actually turned off ).
11. Brake Amount

Brake Strength changes how powerful the brakes feel, from soft (weak) to hard (strong).
# 10%; The brake will engage at 10% strength ( where 100% is the maximum strength setting ).
# 50%; The brake will engage at half strength.
# 100%; The brake will engage at full strength.
There are pre-set increments of 10% or you can put in a custom number setting between 1 and 100 if you would like. Brake strength is very much a personal taste setting- there is no perfect %, but I suggest something around 30-50% to begin with, and adjust as desired to suit your driving; too strong & the truck will perform undesired front-flips. Too weak and it will not slow down quickly enough to take turns or avoid collisions.
12. Drag Brake
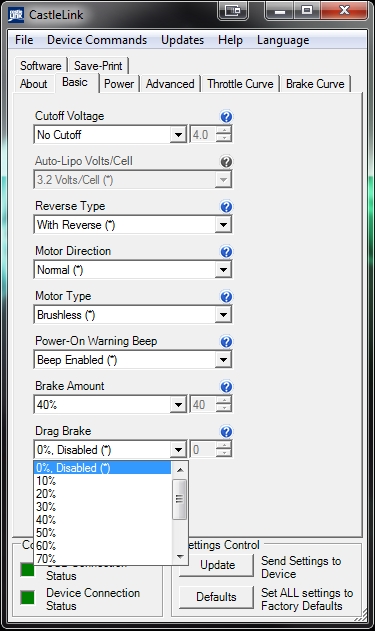
A drag brake slows the car by a settable amount, by applying a small amount of brake to the motor when the throttle is at neutral. Most brushed motor powered cars act this way when no power is being applied to the motor, and the car is moving. You can set the controller for a certain amount of drag brake strength at neutral throttle to simulate this. A small amount of drag brake is often useful in racing, to allow a corner entry in a more controlled state, rather than having to use heavier brakes applied by the throttle trigger. Experiment with different settings on different tracks, to be able to tune to the conditions quickly wherever you race. Drag brakes will also increase motor temps during use so consider this if you are pushing the truck hard and running quite warm temps under normal circumstances; 4 pole motors like the NeuCastle, Neu, MedusaResearch & Hobbywing motors will have a higher 'natural' drag-brake effect vs 2 pole motors like Feigao, Lehner & Hacker, so for bashing zero drag brake is recommended generally.
13. Power Tab
The first setting under the Power Tab is Max Forward Power:
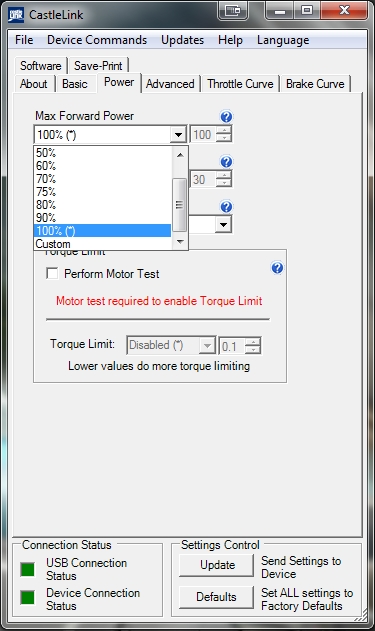
This setting is used to simulate EPA ( End Point Adjustment ) on the throttle channel in order to limit the amount of forwards throttle and therefore speed, even when the throttle trigger/ stick is pressed fully on the transmitter. Generally it is advised to leave this setting at 100% as running the throttle at less than 100% will cause the ESC to be less efficient and overheat sooner. In some cases where a setup is too powerful and changing the batteries or motor isnt practical, dialling down this setting to about 70-80% can take just enough edge off of the top speed to make the vehicle more controllable; it is still advised to look into a lower kv motor, gearing down or using lower voltage batteries to reduce top speed.
14. Max Reverse Power
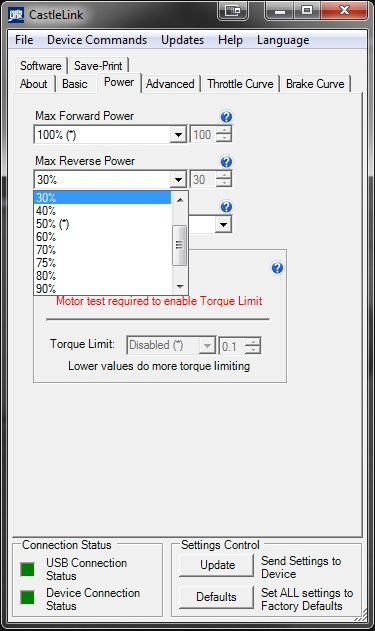
This sets the maximum allowed reverse throttle applied to the motor at the full brake/reverse position. When set very low, the speed of the car in reverse will be slow. When set very high, the reverse speed will be fast. You can also adjust the brake curve to further tune it to your driving style and track layout. The increments are set up the same as the Brake amount.
NB: I recommend a setting of 30%- no one needs to go 40mph in reverse...
15. Punch Control
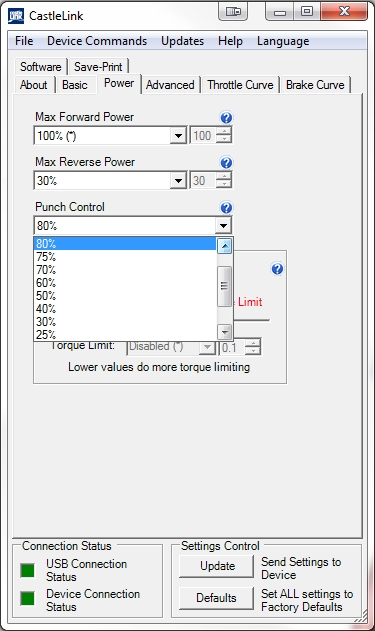
This setting controls how much the ESC limits the current draw of the motor, in order to maintain control of the car under acceleration from a dead stop, or coming out of a corner. The higher the setting, the "calmer" the acceleration will be from a stand-still, or from low speed to high. This also helps protect tires and drive-train during bashing, by putting them under less stress from the motor. Remember, an electric system is only as good as the batteries powering it, and the system cannot make up for a lack of performance from the packs/connectors. While running with very little punch control, or with the punch control off ( less punch control = more punch and vice-versa ), punch & acceleration power are at the mercy of the batteries; the better the pack, the more off-the-line power you'll have available.
16. Torque Limit
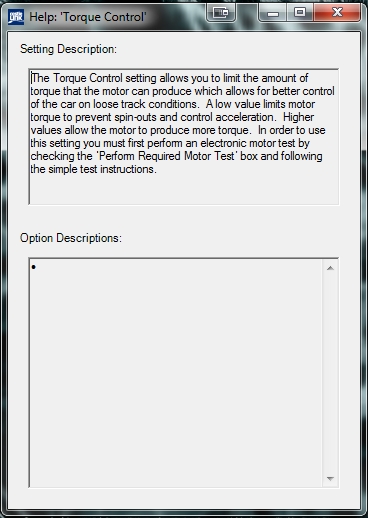
The Torque Limit feature is essentially a more effective form of Punch Control, where by the ESC can detect how much load is being placed on the motor and reduce the power it receives- this is extremely useful and effective for reducing wheelies and back-flips from a standing-start, something you definitely do not want when you are racing.
Enable this setting by ticking the check-box and then following the instructions on screen.
17. Advanced Tab
The first setting on the Advanced Tab is for Sensorless Motor Timing:
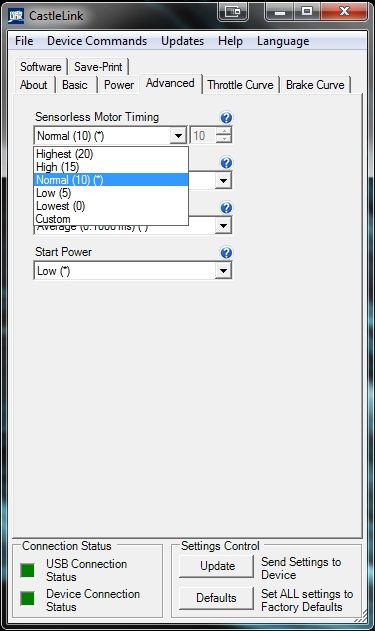
Motor timing settings change the timing advance range used on the motor. Generally, lower advance gives more efficiency and less power, higher advance gives more power at the expense of efficiency (motor heat). Every system will respond to changes in advance differently- this can be affected by the pole count and the winding configuration of the motor ( Wye or Delta ). Castle Creations controllers automatically determine the correct and best range of timing advance for any motor they are plugged into. You can move up or down within that range via these settings.
NOTE: It is suggested by Castle that the esc should be kept at the default setting for best performance with Castle 4 pole motors. These motors are powerful Wye ( Y ) winds and do not require timing advance for extra performance, they will only run hotter for very little extra power.
18. Arming Time
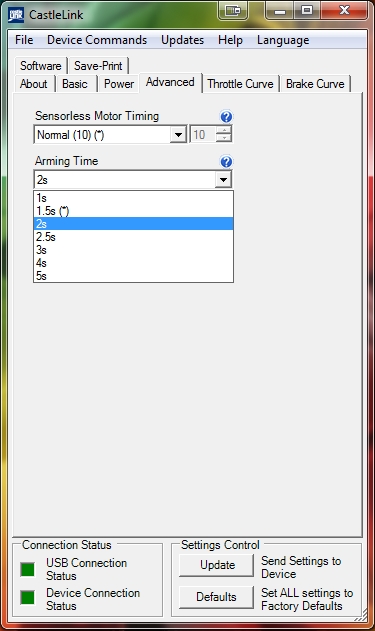
This setting alters the amount of time it takes to arm the esc. If you are using a 2.4Ghz radio that takes a long time to synchronize to the receiver on power-up, you may need to use this setting in order to give the TX and RX a chance to link up prior to the ESC arming and seeking a valid control signal.
An arming time of 1.5 to 2 seconds should be adequate for most radios, though you can increase this if you find the TX and RX arent linking correctly before the ESC arms, which will result in the ESC failing to find a valid signal.
19. Throttle Dead Band
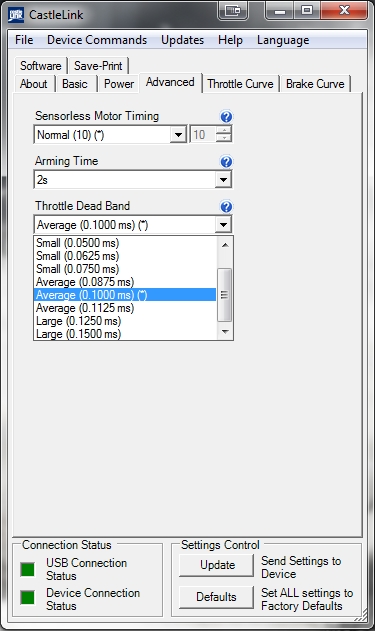
The dead band setting is used to adjust how sensitive the ESC is to throttle movement on the transmitter. A smaller dead-band setting will make the throttle much more sensitive to small inputs and nudges against the throttle trigger/ stick- it is recommended to use the default setting ( average ) to avoid accidental runaways caused by an overly sensitive throttle.
20. Start Power

This setting controls how much power the controller is allowed to send the motor to start the car rolling from a dead stop. The default setting of low will be fine for most 2 pole and 4 pole motors; only motors with a higher pole count ( outrunners ) or very high KV rating will need a higher start power to get them spinning from a standstill, or if you are geared extremely high. Occasionally you may experience a stuttering motion from the motor when you apply throttle, this is normally caused by using batteries that cannot supply enough current to meet the demands of the motor to get it spinning- this is why it is strongly recommended to use good quality Lipo batteries, or to restrict your gearing to approximately 30-35mph when using 12-14nimh cells in a Brushless Emaxx or Erevo, or similar sized truck.
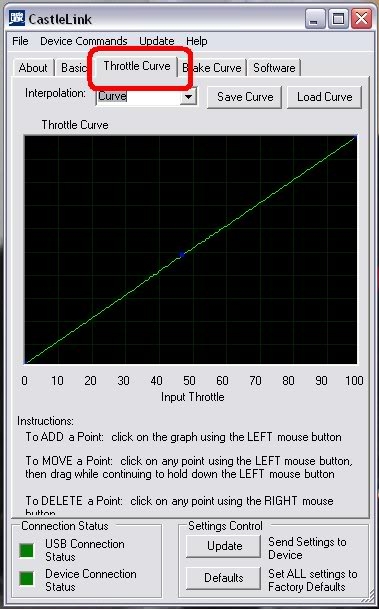
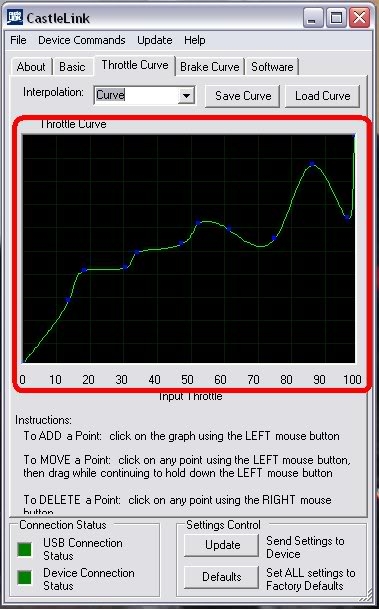
21. Throttle Curve
The next tab in the window is throttle curve:
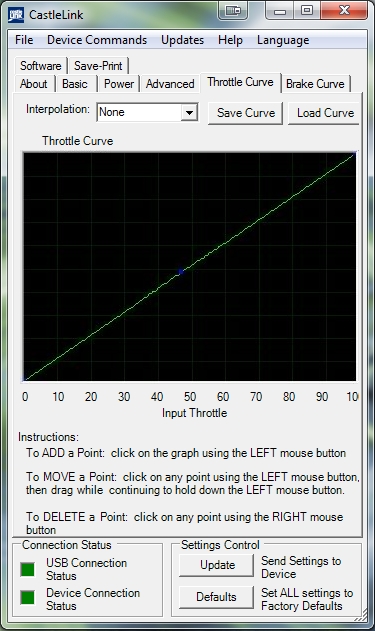
The default curve is actually a straight line. Changing a throttle curve can help to accommodate many set-ups. But just to give an example (and keep it short) I will show you one. Let's say you're having a hard time controlling the truck from doing wheelies off the line. Once the truck is rolling, wheelies aren't too much of a problem, but from a standstill you want more control. Here is what you can do to manipulate your throttle curve, and gain better control of the truck:
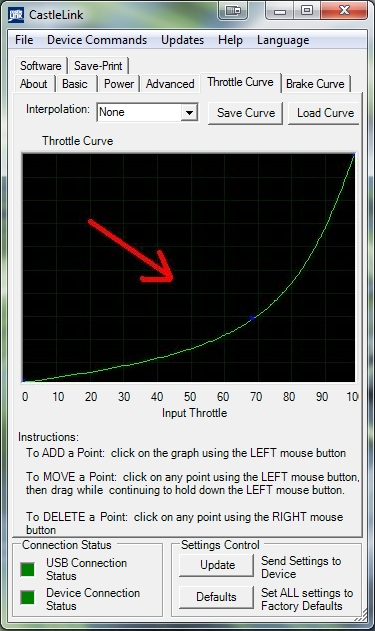
NOTE: The curve above is exaggerated for clarity.
By clicking the line and dragging down, you will have softer starts without losing any top speed. This will allow for a smoother transition from lower speeds- the truck won't feel as squirrelly. Personally I only use a little exponential on the curve since I dont always have as much room to drive in as I'd like, so extra lower-speed controllability is useful:
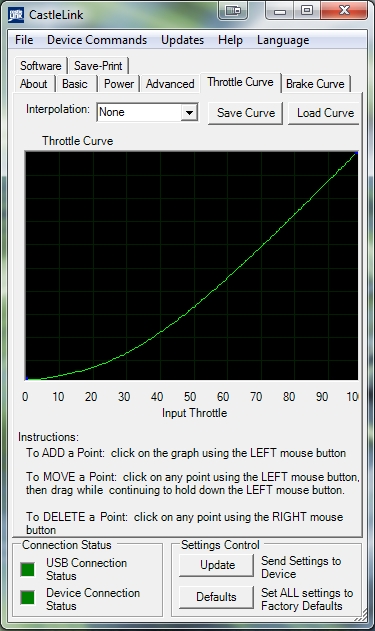
You can also add upto 10 points on the throttle curve to create defined increases in speed at each point, rather than a smoother gradual increase in speed when there are no points on the curve.
22. Brake Curve
The next tab is Brake Curve:
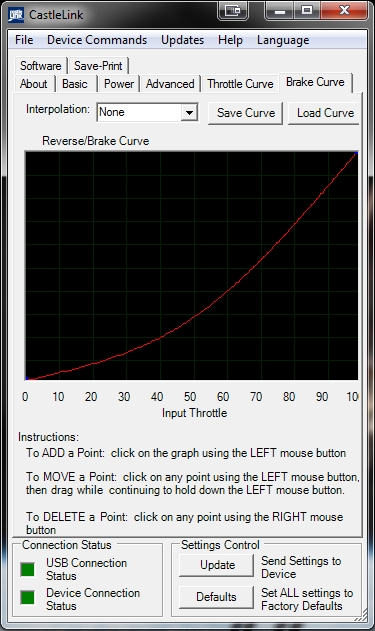
It is adjusted the same way the throttle curve is, only it adjusts the braking function of the truck. If you find that your initial braking is too harsh, you can soften it by adjusting the curve.
23. Save-Print

Once you are happy with your settings you can choose to save them to a file on your computer. This is useful if you like to experiment with different settings or want to copy the settings to another ESC, or to save your settings incase your esc is damaged meaning you can quickly load your favourite settings to the replacement.
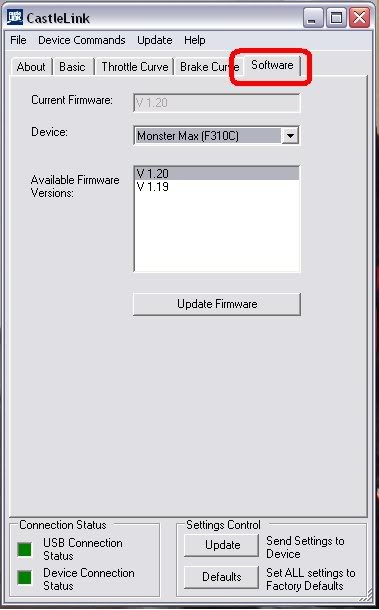
24. Software Tab
The Software Tab is actually the section used to see information about the firmware on the ESC & select different versions:
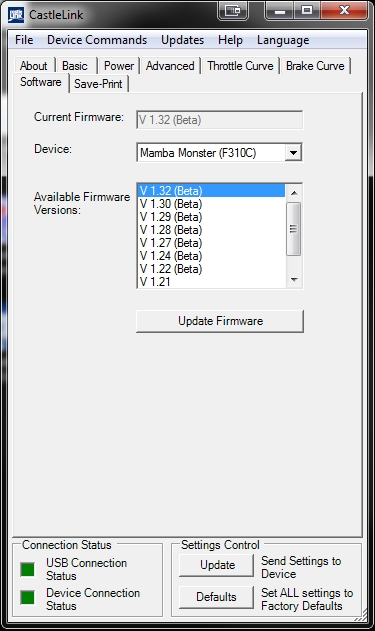
As you can see, it lists all the current firmware and usually all the older versions too, the name of the device connected ( ESC, BEC etc ), and what firmware versions are available to be loaded onto the ESC.
At present, the latest version available is v1.32- the Torque Control feature was introduced with v1.29.
NB: It is recommended to skip firmware v1.28 as this is known to cause some Castle escs to stop functioning correctly- downgrading to an earlier revision usually fixes this issue. In some situations versions of Firmware later than v1.24 can cause throttle & control issues at low rpms/ throttle input- please try a different version of firmware if you experience these issues- I recommend v1.24 as it is the last 100% stable firmware.
A new firmware version has recently been introduced ( 1.38b, in Castlelink software version 3.52.10 ) which reintroduces the older start up algorithm for smoother acceleration from a stand still, worth trying if you experience less than perfect starts with other later firmware versions.
---------- CASTLE LINK GUIDE FOR VERSION 1.24 ( LEGACY FIRMWARE VERSION FOR THE ORIGINAL MAMBA MONSTER ESC ) ----------
CONTENTS:
1. The Hardware
2. Connecting the Castle link to your esc & PC
3. Brake/Reverse type
4. Brake amount
5. Reverse throttle
6. Punch control
7. Drag Brake
8. Start power
9. Motor timing
10. Motor type
11. Arming time
12. Cutoff voltage
13. Throttle curve
14. Brake curve
15. Software/Firmware
1. The Hardware
The hardware consists of a USB to USB mini cable as well as a small PCB mainboard that you connect the ESC to. This board has been released in a couple of varieties, one with and one without servo wires connected, and in a couple different colours too. If you have the one without the servo wires, make sure you connect it correctly.
The board has markings for + - and what looks like a U. The - is always the darkest wire or black, the middle or red is always + and the last wire is for data:
2. Connecting the Castlelink to your esc & PC
Connect the servo wire coming from the Mamba Monster ESC to one side and plug the usb mini into the other:
You then plug the other end of the USB cable into your computer. You will have to open the receiver box in order to connect the MMM's rx lead to the Castlelink- you can avoid this by using a servo Y-splitter plugged into your throttle channel & running the other leg out of the rx box; undoing a couple of screws isnt exactly terribly taxing though. You can trace the rx lead from the esc to the rx to make certain you are unplugging the correct one before connecting it to the castlelink.
Thats it for hardware connection, nice and simple. You should have downloaded & installed the Castlelink PC software and updated it to the latest version available from the CastleCreations website, click HERE for the latest version. After connecting the Castlelink to the PC, run the PC program and you should be greeted with the following screen:
Both status indicators should be green indicating that the esc & castlelink are synchronised to the PC- the LEDS on the esc will also turn on.
NOTE: if the castlelink becomes hot during connection unplug it immediately, this is often an indication of of a faulty BEC on the esc ( warm is normal however ).
3. Brake/Reverse type
Notice there are tabs at the top, each one has its own page of settings:
To get started, click on the "Basic" tab.
The first dropdown menu is "Brake/Reverse Type";
Here you have three options:
1) Proportional w/o Reverse
2) Forward to Brake To Reverse
3) Proportional w/ Reverse Lockout.
This setting is used to determine if reverse is enabled, and if so - how "easy" it is to make the car run in reverse. Many tracks do not allow racing when reverse in any form is enabled on the controller - check your track rules for what is legal.
# Proportional w/o Reverse
Racing setting - no reverse enabled at all.
# Forward to Brake To Reverse
Similar to lockout-type, but no neutral waiting required before reverse is enabled. The controller will quickly brake the motor to near zero rpm, before allowing it to run in the opposite direction in order to save transmission parts. This was the default setting on mny original MMMs- not recommended anymore.
# Proportional w/ Reverse Lockout
For bashing or racing (may not be an allowed setting for racing). The controller must see 2 seconds of steady neutral throttle before it will allow reverse operation. This is default setting.
4. Brake amount
Castle Creations software allows you to fine tune the brake for specific applications. Brake Strength changes brake strength form soft (weak) to hard (strong) braking.
# 10% The brake will engage at a strength 10% as strong as the strongest brake setting.
# 50% The brake will enage at a strength 50% as strong as the strongest brake setting.
# 100% The brake will engage at full strength.
There are preset increments of 10% or you can put in a custom number setting between 1 and 100 if you would like. Brake strength is very much a personal taste setting- there is no perfect setting, but I suggest something around 30-50% to begin with, and adjust as desired to suit your driving; too strong & the truck will perform undesired front-flips. Too weak and it will not slow down quickly enough to take turns or avoid collisions.
5. Reverse throttle
This sets the maximum allowed reverse throttle applied to the motor at the full brake position. When set very low, the speed of the car in reverse will be slow. When set very high, the reverse speed will be fast. You can also adjust the brake curve to further tune it to your driving style and track layout. The increments are set up the same as the Brake amount. I recommend a setting of 30%- no one needs to go 40mph in reverse...
6. Punch control
This setting controls how much the ESC limits the current draw of the motor, in order to maintain control of the car under acceleration from a dead stop, or coming out of a corner. The higher the setting, the "calmer" the acceleration will be from a stans-still, or from low speed to high. This also helps protect tires and drivetrains during bashing, by putting them under less stress from the motor. Remember, an electric system is only as good as the batteries powering it, and the system cannot make up for a lack of performance from the packs/connectors. While running in the very low limiting, or with the limiting off, punch & acceleration power are at the mercy of the batteries; the better the pack, the more off-the-line power you'll have available.
7. Drag brakes
A drag brake slows the car by a settable amount, by applying a small amount of brake to the motor when the throttle is at neutral. Most brushed motor powered cars act this way when no power is being applied to the motor, and the car is moving. You can set the controller for a certain amount of drag brake strength at neutral throttle to simulate this. A small amount of drag brake is often useful in racing, to allow a corner entry in a more controlled state, rather than having to use heavier brakes applied by the throttle trigger. Experiment with different settings on different tracks, to be able to tune to the conditions quickly wherever you race. Drag brakes will also increase motor temps during use so consider this if you are pushing the truck hard and running quite warm temps under normal circumstances; 4 pole motors like the NeuCastle, Neu, MedusaResearch & Hobbywing motors will have a higher 'natural' drag-brake effect vs 2 pole motors like Feigao, Lehner & Hacker, so for bashing zero drag brake is recommended generally.
8. Start Power
This setting controls how much power the controller is allowed to send the motor to start the car rolling from a dead stop. The default setting of low will be fine for most 2 pole and 4 pole motors; only motors with a higher pole count ( outrunners )or very high KV rating will need a higher start power to get them spinning from a standstill, or if you are geared extremely high. Occasionally you may experience a stuttering motion from the motor when you apply throttle, this is normally caused by using batteries that cannot supply enough current to meet the demands of the motor to get it spinning- this is why it is strongly recommended to use good quality Lipo batteries, or to restrict your gearing to approximately 30-35mph when using 12-14nimh cells in a Brushless Emaxx or Erevo, or similar sized truck.
9. Motor Timing
Motor timing settings change the timing advance range used on the motor. Generally, low advance gives more efficiency and less power, high advance gives more power at the expense of efficiency (motor heat). Every system will respond to changes in advance differently- this can be affected by the pole count and the winding configuration of the motor ( Wye or Delta ). Castle Creations controllers automatically determine the correct and best range of timing advance for any motor they are plugged into. You can move up or down within that range via these settings.
NOTE: It is suggested by Castle that the esc should be kept at the lowest setting for best performance with Castle 4 pole motors. These motors are powerful and do not require timing advance for performance.
10. Motor Type
This setting determines what motor type the controller will run, and in what configuration. Your options are the following:
# Brushed High-Power
Use this setting to run a brushed motor in forward and brake only mode for racing- there is a special wiring sequence for this mode, see the manual for details.
# Brushed Reversing
Use this setting to run any brushed motor, and have access to reverse.
# Brushless
Use this setting to run any brushless motor.
11. Arming Time
This setting alters the amount of time it takes to arm the esc. If you are using a 2.4Ghz radio that takes a long time to synch to the receiver on power-up, you may need to use this setting in order to properly calibrate the unit by increasing the arming time.
# 1 second- Waits for 1 second of neutral throttle before arming.
# 5 seconds- Waits for 5 seconds of neutral throttle before arming.
12. Cutoff voltage
The cut off voltage is set to protect Lithium Polymer batteries from being over discharged which will damage the battery (less than 3v per cell as a general rule). If you are using NiMh or NiCd batteries you do not need a cut of voltage to protect the batteries, as these types of batteries show drastic decrease in performance before they are discharged to zero. The ERBE & EMBE are designed with a series harness, remember to add the voltage of your batteries together to determine cutoff value.
# Auto Li-Po- Use this for all applications where you are using Lipo batteries. When selected, the controller will detect the number of Lithium Polymer cells in series in your battery pack(s), and set the cut off voltage to 3 volts per cell. When you plug the battery pack into the controller, after the initialization tones the controller will flash and beep the number cells it counted, so you can confirm the controller setting. If the cell count is incorrect, make sure your batteries are fully charged and the correct cell count is flashed BEFORE driving. Note: Do not use Auto Lipo with NiMH or NiCad cells.
# Custom- Use this to enter your own cutoff voltage ( the auto setting of 3.0v per cell is deemed a bit on the low side generally ). A setting of 3.2v per cell, or even 3.4v per cell is considered a much safer setting and will not shorten runtime by more than a minute or two due to the sharp drop-off in voltage lipos experience when they near the end of their discharge cycle.
Since Auto lipo has a default setting of 3.0v per cell it is strongly recommended to adjust it via the CastleLink program and raise it to approx 3.2-3.4v per cell; the esc will beep back the number of cells it believes are connected as with the standard auto-lipo procedure.
13. Throttle Curve
The next tab in the window is throttle curve:
The default curve is actually a straight line. Changing a throttle curve can help to accommodate many set-ups. But just to give an example (and keep it short) I will show you one. Let's say you're having a hard time controlling the truck from doing wheelies off the line. Once the truck is rolling, wheelies aren't much of a problem, but from a standstill you want more control. Here is what you can do to manipulate your throttle curve, and gain better control of the truck:
NOTE: The curve above is exaggerated for clarity.
By clicking the line and dragging down, you will have softer starts without losing any top speed. This will allow for a smoother transition from lower speeds. The truck won't feel as squirrelly. To add points, you click the graph with your left mouse button. To move them, you click with the left mouse button and drag to the desired position. To remove a point, you right click over the point you need removed.
In the example above, a curved line was used. But the same point can be used with a linear setting if you find it suits your needs better:
In fact, you can add upto 10 throttle points to get your throttle curve as specific as you need it:
NOTE: your throttle curve should never look like this...
14. Brake Curve
The next tab is Brake Curve:
It is adjusted the same way the throttle curve is, only it adjusts the braking function of the truck. If you find that your initial braking is too harsh, you can soften it by adjusting the curve.
15. Software / Firmware
The last tab in the window is labeled Software, but it is actually the section used to see information about the firmware on the ESC & select different versions:
As you can see, It lists the current firmware, the name of the device, and what firmware versions are available to be loaded onto the ESC. At present, the latest version available is v1.29 which also has the new 'Torque control' feature, a more effective effective tool for limiting power to the motor compared to the existing 'Punch control' feature. It is recommended to skip firmware v1.28 as this is known to cause some Castle escs to stop functioning correctly- downgrading to an earlier revision usually fixes this issue.
A massive thanks to 'HoovHartid' from the Traxxas & RC-Monster forums, without whom I would have had to do most of the hardwork myself, many thanks for the guide and pictures dude.
For more technical information and 'How-to' guides regarding the E-Maxx trucks and Batteries, please visit the FAQ, Tutorials & Useful links pages.
|
|
|
