|
|
|
WELCOME TO THE SMALL PROJECTS PAGE SOMETIMES I DO PROJECTS THAT AREN'T LARGE ENOUGH TO DESERVE THEIR OWN DETAILED PROJECT PAGE, SO I'LL BE CATALOGUING THEM HERE INSTEAD. |
||||||
| CONTENTS:
BOOKSHELF LIGHTS | BOOKSHELF LIGHTS The problem with watching so many Youtubers doing DIY and home improvement is that occasionally you see things that you can manage to copy yourself, in my case I've seen a few folks adding lighting to their built in cabinets and shelving, and decided that it would indeed look nice to add some illumination to my book shelves. I grabbed a cheap reel of COB LEDs, the type with lots of densely packed tiny LEDs with much more even illumination compared to older style strips, and some angled aluminium mounting hardware with diffusers for a softer spread of light from ebay. Once everything arrived I cut the LED strip and aluminium down to length and soldered jumper leads from alternating ends to create three linked sections in total, allowing me to pass the wires down the back of each shelf, avoiding the need for drilling loads of holes to feed wires, instead I just had a single cable to feed out of an existing hole behind the printer, that then plugged into an existing USB hub for power ( powered by my PC so that the lights turn on and off with the PC, no need for separate power supplies or switches in awkward places ). I had a little bit of trouble with the wires coming unstuck from the tiny solder pads and had to extend the wires a few inches after misjudging how tight things would be after routing the wires, but in the end I got everything installed and the aluminium screwed and clipped into place and wrestled the diffusers into position- the wires are barely noticeable as they are pretty thin old speaker wires ran down the corners. Given how cheap everything was- eight quid for the 6 meter LED strip and eight quid for the aluminium mounting hardware, it's a DIY project I can easily recommend to anyone looking to add some illumination to shelving or cabinets and such; I still have about 4 meters of kit left so I may do something interesting with it if inspiration strikes, illuminated wall art or something like that, we'll see. | |||||
|
| THE SODA CLUB I found an old, empty Soda Stream bottle ( Co2 bottle ) in the bin at work, after staring at it for a moment I thought it would make a cool improved weapon if I added a handle of some sort, so I did. I removed the valve, added a 12 inch threaded bar ( M18x1.5 ), an aluminium tube with rubber grip, a wooden door knob to act as a pommel, and a large nut as an end cap. The hardest part of this 'project' was trying to drill a hole in the wooden door knob as there was no good way to hold it securely, to the end result was a slightly wonky and off-center hole; bleh, it's good enough for me though. The assembled 'Soda Club' ( you'll understand when you see the pictures ) is 60cm / 2 foot long, 6cm diameter, and weighs 1.35kg / 3 lbs. The balance point is right at the joint between handle and bottle, so it handles quite nicely compared to a baseball bat- admittedly I could have bought a bat for less than this cost to build, but I couldn't resist such a quick and easy project, so yeah. Enjoy the pictures below. | |||||
|
| PULSE RIFLE WALL DISPLAY I build and/or collect too many replica pewpews and they were crowding the display table too much, so I decided to mount my beloved Pulse Rifle onto my bedroom wall. I wanted something a little fancier than a plain black mount, so I had a look on Etsy and found someone selling printed metal signs- they had one for Weyland Yutani so I grabbed that and glued/bolted it to an 18mm MDF board cut to size and painted black around the edges. To hold the rifle itself I bought some very sturdy L-shaped brackets that I screwed to the board through the sign, and once again employed a couple of the 'Snap-toggle' heavy duty cavity wall fixings to bolt the whole assembly to the wall. A couple rubber pads were glued to the top of the brackets for cushioning and the Display was complete- you'll have to excuse the less than ideal photos, the natural light isn't great and the mood lighting is a little gloomy, but you'll get the idea of how it looks. | |||||
|
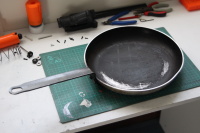
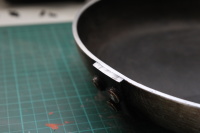
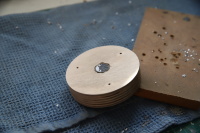
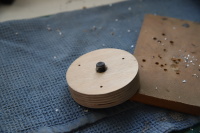
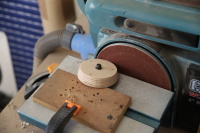
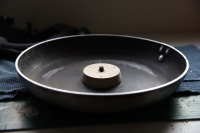
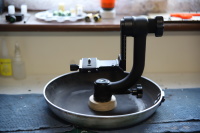
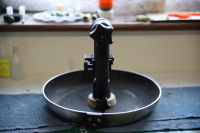
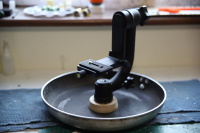
| GROUND POD PROJECT If you want to take low-angle photos with a camera, typically you have to either rest your camera and lens on the ground, use some kind of make-shift cushion, or invert the main shaft on your tripod- none of these options are ideal and if your are using a large telephoto lens you need something sturdy to prevent unwanted movement; behold, the Ground pod, a very low-profile 'foot' that you can mount or lens or camera gimbal and lens to. You can purchase these from a few brands but they are almost comical overpriced for what is essentially a shallow plastic bowl with a mounting point in the middle. Various people have made their own versions over the years using different approaches- frying pans, pvc pipes, even 3D printed versions; I will be using an old frying pan for my version. The construction process was quite simple, I cut the handle off of the pan and sanded the stump smooth, cut a round lump of plywood and drilled some holes in it for mounting to the pan along with a central larger hole into which I forced a 3/8" hex bolt. I used my disc sander to give this wooden disc a more pleasant shape with angled sides and screwed it to the centre of the pan leaving the 3/8" screw sticking up, onto which I screwed the camera gimbal. It's not a light assembly I must admit, but it won't tip over easily or blow away either... | |||||
|
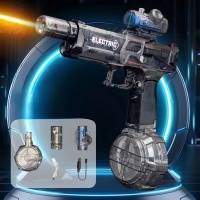
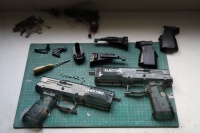
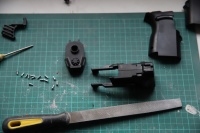
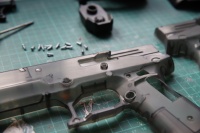
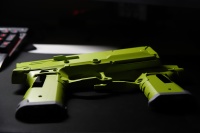
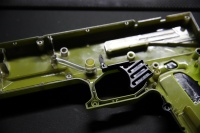
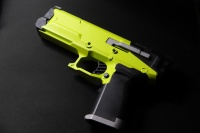
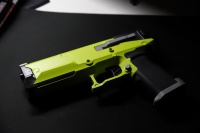
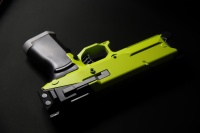
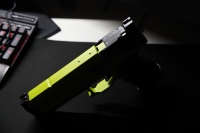
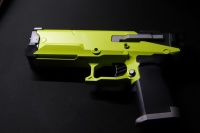
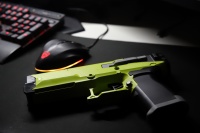
| CYBERPUNK PISTOL I like the Cyberpunk aesthetic, I like replica pew pews, and I like prop making so I decided to combine all three for this project. After seeing a cool-looking electric water pistol I thought it would be perfect for modding into a cosplay prop with just a little work to the shell and a suitable paintjob to match the Cyberpunk theme. I opened up the shell and removed the guts of the squirt gun, installed a spring to act as a trigger return, filed down an angular nub for a cleaner appearance, then sanded, primed and painted the shell. I used Montana cans 'Poison' paint, a lovely acid-green colour along with some Humbrol enamel paint in a metallic grey finish for some detail parts ( magazine-well opening and some details on the slide ) to complete the look. Right now I could call this finished, though I could certainly take it much further with a weathering pass and some additional details such as LEDs, wires and small circuit board(s) to really sell the futuristic appearance. We will see... February 2025 update- I did indeed add additional detail. I mounted a cheap red-dot pistol sight on top- cheap, but folds flat when not in use and looks very futuristic which is perfect. I also added some random flat ribbon cable to give the impression of the pistol and sight being connected electrically, and did a little silver dry-brushing on high spots to give a lightly worn look to the pistol. LEDS would be nice but they'd only be lit up for photos- I could fake that in photoshop if I really wanted to but it's fine, I think this is good enough for sitting in a display cabinet. | |||||
|
ADDITIONAL DETAILS UPDATE:
| WEAPON DISPLAY PLAQUES What do you do when you have too many things to display? Hang them on the wall of course! I jumped on Ebay and grabbed a couple oval MDF plaques, figured out where I wanted the hanging hardware, marked and drilled the appropriate holes, then went to painting. Started off by sanding the edges with fine grit paper since MDF tends to be quite fuzzy where it's cut, then a once over with Scotch-brite for a super-smooth finish. Next is a coat of grey primer, let it dry, and hit it with the Scotch-brite again all over, let it dry, and the first coat of black paint. Another once over with the Scotch-brite and another coat of black, let it dry, then install the hardware; for my sword I used a couple square-edge coat hangers, for my 'Alita Battle Angel' hammer I used a couple decorative hangers that are essentially rods with a wider base and head, in black. I used heavy-duty cavity wall hardware on the back to make sure they didn't rip out of the wall under the weight, recessing a shallow pocket on the back of the plaques so that they sit flush against the wall with the hardware in place. I used the router attachment for my rotary tool to do that- I've had it for years but this is the first time I've had the chance to use it, so that's nice. The other item hanging on the wall is my 'Tom Anderson Pantera'- a combination of knuckleduster and Wolverine claws essentially; I bought this item just before the large ban on knife sales, the irony being someone was stopped from entering a nightclub and found to be hiding this same model of weapon in their jacket, resulting in an arrest, public outcry and government reaction to crack down on knife sales. So yeah, thanks for that chap, way to go, way to be THAT person that ruins knife collecting for everyone... | |||||
|
| ||||||