|
|
|
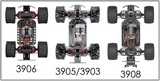
WELCOME TO THE E-MAXX 3906 UPGRADE GUIDE THIS IS AN IN DEPTH GUIDE TO UPGRADING THE TRAXXAS E-MAXX 3906 TO HANDLE UPGRADED BRUSHED MOTORS & BRUSHLESS POWER |
|
| CONTENTS:
Introduction So, you have a mouldy old Emaxx 3906 that you had stashed in the garage for several years, or you bought it from Ebay/Craig's List without checking what model it was exactly, and now you want to upgrade it to handle Lipo batteries & Brushless power. If you are after a project truck or are happy to spend the money upgrading this truck rather than just buying a much newer Emaxx, then sit back & let me guide you through the upgrade process.
1. Transmission & Slipper Clutch Slipper upgrades The stock transmission is a 2 speed unit that is shifted via a servo, but this design doesn't deal well with the power of a BL motor at all- in fact, it often fails quite easily with just brushed motors. The issues are that the stock slipper clutch uses small friction pegs inserted into the spur gear and a spring loaded pressure plate to control torque delivery; the problem is too much slippage causes the slipper pegs to melt, and the spur will just spin and spin, without sending any power to the wheels, or the slipper plate will overheat causing the spur gear to melt in the centre. Simple solution is to tighten the slipper fully, though this does add more stress to the driveline resulting in broken driveshafts and diffs. Best solution is to upgrade the slipper- there are a few options out there such as the Robinson Racing double disc slipper, or the extremely rare Strobe sprong. A great option for serial modders is to retrofit the transmission with the 3903/08 spec slipper assembly: New Emaxx slipper on 3906 transmission RobinsonRacing Slipper
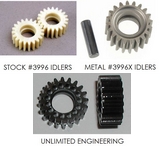
Transmission Upgrades Within the transmission, the stock idler gears are known to fail quite easily, especially under BL power as they are made from fairly weak plastic, but thankfully there are also several after-market solutions: Unlimited Engineering Hardened Steel Idler Traxxas Steel Idler Gear #3996X
The UE idlers will be a direct fit, the Traxxas idlers should be a direct too even though they are intended for the newer design Emaxxes ( 03/05/08 ). There is also the extremely rare ULTRAMAXXED titanium gear sets which appear on ebay occasionally, but these tend to sell for $400-600; very rare & high quality indeed. Besides the idler gears, another common point of failure is the small roll-pin which holds the metal input gears onto the input shaft ( same shaft as the spur gear mounts to the end of outside the tranny case ). This is easily strengthened by tapping out the roll-pin & replacing it with a short piece of drill bit or hex key, then secure it with a few drops of CA glue or JBWeld- see below:
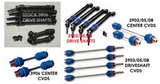
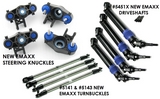
A company called GorillaMaxx used to sell a single speed conversion kit that removes 1st gear and half the transmission case, an ideal way to save weight and eliminate the shifting mechanism, but due to tough economic conditions they are currently no longer producing r/c parts so the only place to find a GorillaMaxx transmission is on ebay these days. Once you have addressed the Transmission & Slipper clutch weaknesses, you will need to look at the next link in the chain; the driveshafts... 2. Driveshafts The old Emaxx uses rather soft and flexible plastic for the 6 drive shafts (2 centre, 4 outdrives), and these are well known to flex and twist rather easily, often becoming completely mangled like pretzels, especially under BL power. Thankfully there are plenty of aftermarket solutions, such as the steel CVDs sold by various companies: MIP CVD upgrades for old T/E-Maxx Dynamite CVDs Traxxas Center CVDs for Emaxx 3906 #4951R RDLogics CVDs A common upgrade that is cheaper in most cases is to upgrade to a 3903/05/08 spec driveline, that is, to use new style Emaxx driveshafts or CVDs, knuckles and turn-buckles in place of the stock 3906 items. This also gives the truck a wider stance as a small bonus. The centre shafts of the old Emaxx are a different length to that of the new truck, so you will either need to use the Traxxas or aftermarket brands of center CVDs specifically designed for the shorter wheelbase 3906 emaxx, or seek out some dogbone shafts instead perhaps.
As for the required new Emaxx spec-parts, you will need the driveshafts ( #5451X ), the steering knuckles/ bearing carriers ( no part#, simply search ebay for 'new emaxx knuckles' or '3908 knuckles'- they will have blue rubber dust boots and are obviously a beefier design than the old emaxx knuckles ) & the turnbuckles ( #5141/5141A/5141R fronts, 5143/5143A/5143R rear- you can also find complete sets on ebay again if you search for 'new emaxx turnbuckles'; anything for the 3903/3905/3908/ 16.8v Emaxx is fine ).
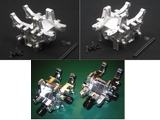
3. Differentials Stock differential Shimming guide The fundamental weakness in the design is that the diffs only use 4 spider gears ( the small gears inside the diff cup, within the diff case itself ), and a plastic cup and case. Despite the introduction of the 4-screw diff case, the stock plastic cup is still prone to flexing, and this leads to stripped or blown diff gears. The simple solution is use a metal diff cup which removes a lot of flex in the spider gear area, and a metal diff case that should help prevent the ring gear and pinion from loosing mesh. Carefully shimming the ring and pinion will also help to some extent: Emaxx diff shimming guide FLM Hybrid Diffs However, with high powered BL systems this often still isn't enough, and more expensive options need to be explored. FLM ( Fast Lane Machine ) sell a hybrid bulk setup that combines the bulkheads with the diff case, and uses 1/8 scale diffs that are near bullet proof: Front Hybrid Bulks Rear Hybrid Bulks Installation Guide
Unlimited Engineering UltraLite Diffs UE ( Unlimited Engineering ) sell their UltraLite 6 or 8 spider differentials- the case of which can also be used with OFNA or HotBodies 1/8 scale diifs, as can the FLM design: 6 Spider kit 8 Spider kit Ultralite cases only Installation guide ( using Hotbodies Lightning buggy diff internals )
LST2 Differential DIY upgrade A custom DIY upgrade is to use Losi LST2 diffs that can be quite easily modified to fit the stock design of Maxx bulkheads- just search ebay for 'LST2 differential' and opt fro some with the alloy diff casing, rather than the plastic casing: LST2 cheap 1/8 scale differential upgrade guide
KMaxx Kustoms 1/8 scale Diffs A new option for 1/8 scale diffs comes from a long-time custom part builder KMaxx Kustoms on FaceBook, and is cross compatible with a wide range of 1/8 diff internals to multiple options, including CEN diffs which are readily available unlike many old options that have become discontinued. They are very robustly built with tight machining tolerances, coming sold as pairs including the high quality Tony's Screws for assembly. For more information and to place an order, follow the link below to the official FaceBook page: KMaxx Kustoms 1/8 Scale diffs
4. Chassis The old 3906 Emaxx chassis was specifically designed for use with 2x 6 cell Nicad or Nimh battery packs & as such severely limit your battery options when it comes to choosing lipo batteries. The shorter wheelbase chassis is also more prone to producing wheelies compared to the longer new emaxx chassis; whether you see this as a good or bad thing is personal preference, but after a while being upside down stops being much fun, especially when you are shredding bodyshells every few runs. Options here are somewhat limited- you can either dremel the ends of the battery trays to allow longer battery packs & use velcro straps to secure them in place, or simply upgrade to a larger aftermarket chassis for the 3906 transmission: FLM 3906 Extended Chassis ( Discontinued ) XTreme Racing Carbon Fibre Emaxx chassis
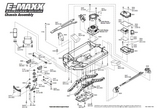
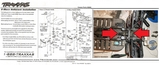
The other option is to purchase a new emaxx chassis ( original grey plastic chassis or aftermarket ) & transmission and then bolt your old Emaxx front & rear ends on essentially. This route would be a alot quicker and easier ultimately since the new style transmission is pretty much bullet proof, but it does require you to locate all the separate parts needed for the 3903/05/08 chassis & transmission. Ebay can help here as many sellers ( chop shops ) sell complete chassis & transmissions to make life easier- refer to the exploded views of the new emaxx to locate any missing parts you need: Emaxx 3908L exploded views & Parts lists
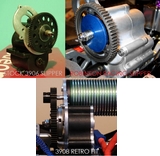
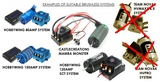
5. Brushless Motor & Esc Upgrades Pre-face: though I try to keep these links updated, some will go dead from time to time- please feel free to exercise common sense & a little google-fu when searching for specific ESCs and/or motors- a quick search on ebay or Google for the name in the description should yield the results you desire. Now that the driveline has been upgraded sufficiently we can actually start exploring the bewildering array of aftermarket BL systems and separate escs & motors there are which would actually be suitable for a ~10lb 4x4 MT. Low cost options At the lower end of the scale there are numerous cheap systems which employ smaller or lower powered/ less efficient motors of 2 or 4 pole design ( 4 pole motors produce nearly twice as much torque and are generally more efficient for a given size/ kv rating ); many of these 4 pole motors are clones of the popular Neu & NeuCastle motors which can be surprisingly similar in performance at a markedly lower price point. As such, these motors are an ideal option for bashers who don't need maximum performance but are on a tighter budget. There is also naturally an ever increasing number of 1/8 scale speed controllers, many of which are also close copies of existing designs, or are based on a single OEM design, albeit with different components in order to achieve a certain level of performance/specification and price point. Often these motors & ESCs can be found in systems together, or sold separately; all that is required to make any given motor and ESC work together is to install matching male & female bullet connectors on the three motor wires- most true 1/8 scale escs with a 100-150amp rating will handle any BL motor upto about ~45mm diameter and 90mm length, though 36-44mm x 74-80mm is more the norm. Low cost Motors, in order of suitability / power output ( best to least ): Tacon 4074 2000kv Great 4-5s lipo motor Tacon 4074 2150kv Great 4-5s lipo motor Turnigy 4074 2000kv Great 4-5s lipo motor Turnigy 4074 2000kv Great 4s lipo motor Leopard 4074 2000kv Great 4-5s lipo motor Kershaw Designs Gen5 motors 4274 2200kv 4-6s max Leopard 4074 2150kv Great 4-5s lipo motor Leopard 4082 1600kv Good 6s lipo motor Turnigy Trackstar 4268 2350kv Fast 4s lipo motor with more moderate gearing, known for higher temps Turnigy Trackstar 4270 2100kv Good 4-6 motor, known for running hotter Leopard 4282 2000kv Massive motor ideal for heavier trucks, 4-5s lipo Infinite 3977 2000kv Low end motor, 4-5s lipo Low cost Speed Controllers, in order of suitability / power handling capability ( best to least ): Hobbywing EZRUN 150amp 6s lipo esc Toro 150amp Clone of the Tekin Rx8 esc, 4-6s lipo HobbyKing 150amp Improved version capable of 6s lipo SpeedPassion Silver Arrow Re-branded Hobbywing esc, 2-4s lipo Complete low-cost systems, in order of suitability ( best to least ): Kershaw Designs Gen5 4s Systems 3874 2400kv & 120amp 4s esc Castle Creations Sidewinder 8th 1515B-2200kv & 90amp 6s esc Novak Diablo Dual Battery System Diablo 550 motor & 4s lipo Sensored esc Speed Passion Silver Arrow 1/8 system 2200kv motor, 2-4s lipo max with moderate gearing OkHobby 160amp 4s System 160amp 5s esc, 3977 2050kv motor OkHobby 160amp 5s System 160amp 5s esc, 3977 1680kv motor Complete Mid-Range Systems Although described here as being mid-range, most of the systems are closer to high end options, albeit at lower cost & are generally copies of the higher end brands. If not mentioned in the listings, be sure to pick up a programming card or box ( or find a listing that has one included for a small price bump- well worth it ): Kerhsaw Designs Gen5 6s Systems 3874 2400kv & 150amp 6s esc HobbyWing XERUN Systems 4274 1800kv & 150amp 6s esc HobbyWing QuicRun Systems 4074 2000kv & 150amp 6s esc HobbyWing QuicRun Systems 4274 2000kv & 150amp 6s esc HobbyWing EXRUN Systems 4274 2000kv & 150amp esc & programming box HobbyWing EZRUN Systems 4274 2000kv & 150amp 6s esc HobbyWing XERUN Systems 4274 2200kv & 150amp Sensored 6s esc
Complete Top-end Systems The obvious choice however for a suitable BL system is to use the same one as the BL Edition 3908 Emaxx comes complete with as standard, the brilliant CastleCreations MambaMonster ( MMM ) brushless esc and motor system. It should be mentioned though that there are different versions of this esc as it is also sold as standard equipment for the Traxxas BL Edition Emaxx & Erevo, and the 'Blur' branded version sold with the HPI Savage Flux ( HPI version cannot be updated past firmware version v1.24 at present )- see below:
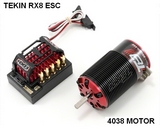
The esc is rated for 6s lipo or 18 nimh cells, the motor is the NeuCastle 1515 1y 2200kv model, based on the popular Neu motor of the same specification. Depending on the size tires you use, and the terrain, gearing of ~18/68 which is good for about 30-35mph with 14 nimh cells or 4s lipo. With higher 24/68 gearing 40mph is easily possible, but only with good quality lipos; nimhs will not provide sufficient current ( amps ) for the esc & motor, and esc damage may occur. This is due to something known as 'ripple current', whereby the voltage from the batteries fluctuates rapidly and drops as the current output increases beyond what it can provide due to high Internal Resistance ( IR ). Lithium batteries have much lower IR levels and so do not overheat or droop their voltage output under such strain ( provided they are of a suitable specification ). With 6s lipo & the correct gearing ( ~28/65 ) it is possible to achieve a maximum speed of around 65-70mph, though aerodynamics & tyre choice become critical issues at this speed; strictly for on-road use only: Castle Creations MambaMonster2 ESC & 2200kv motor combo Castle Creations MambaMonster2 ESC & 2200kv motor combo Castle Creations MambaMonster2 ESC & 2200kv motor combo If you are considering building a lighter weight racing truck, or a lower speed truck built for crawling, then a sensored BL system might be worth considering. The Team Tekin RX8 esc can be teamed with one of several suitable motors they sell to produce a super-smooth ride suited for 4,5 & 6s lipo operation- depending on your exact desires regards speed, operating temperatures and battery budget: Tekin RX8 GEN2 1/8 scale 2-6s lipo sensored & sensorless esc Tekin T8 4038 motors 1700kv > 5s max, 2000kv & 2250kv > 4s max
It is also entirely possible to build a custom system basically, using a mixture of any of the mentioned escs and motors ( since you can often find them for sale used for less than retail price ). You could also go with cheaper motor options such as a Feigao 8 or 9XL which will run quite well on a max of 4s lipo, or perhaps a slightly stronger Leopard branded motor ( seen as a NeuCastle clone by many ) roughly the same dimensions & kv rating as the real NeuCastle 2200kv motor. High end motors tend to take the shape of Neu 1515 or larger models, Lehner 1940 and larger models, Hacker C50maxx and Feigao XL models, and the Castle-Neu MMM motors. There are numerous other good quality motors these days that are suspiciously similar to the Neu & NeuCastle motors, such as the offerings from Hobbywing & Leopard motors- good quality motors, but using lesser quality magnets than the higher quality motors; exploded rotors & higher running temps are likely if you aren't careful with the gearing & kv/ size choice for your application. The Plettenberg BigMaxximum used to be considered the very best of the best, but these days this 4 pole German monster is very overpriced & has a kv rating much too high for use with anything other than 4s lipo- does not make for a very efficient setup at all.
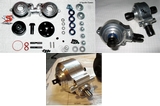
Temperature Guidelines Bare in mind though that using a motor with fewer turns/higher KV rating ( rpms per volt ) and a smaller size will result in higher temps and potential damage to the motor, esc and batteries. 100-180f is generally seen as the safe zone for motors and escs, with 135f or below being optimum. There is an old rule of thumb regarding temps which many will find handy no-doubt: Hot motor + cool esc = under geared. Cool motor + hot esc = over geared. As a general rule this is normal behaviour, though it is possible to get different results depending on the esc and motors used- some motors run hot regardless, and some escs are less capable than others to deal with high current draw. KV Rating & Voltage guidelines It is important to choose a suitable sized and KV motor for MT use- 36-39mm diameter ( not including heatsink fins ), and 60-80mm in length is a good guide. The KV rating will depend on your voltage, but as a general rule again: 2000-2700kv = 4s lipo/ 12-14 cells 1800-2200kv = 5s lipo/ 14-16 cells 1500-2000kv = 6s lipo/16-18 cells If you are planning on using more than 6s lipo, chances are you don't need to be reading this guide. 6. Brushed motor Upgrades If your budget wont stretch to a BL system, or you would prefer to make use of the waterproof nature brushed motors have ( EVX/EVX2 escs are sold as being waterproof, however results vary greatly- you may need to coat the esc with a waterproofing substance such as 'Plasti-dip', but do not cover the metal heatsinks ), but you would also like more power, then upgrading the stock 550 21turn Titan motors is your best option. There are numerous options for upgraded motors, from marginally more powerful yet much more robust drill-type motors ( no more burnt out brushes within a few runs ), to much larger & faster R/C grade motors in varying sizes. Besides some simple rewiring that may be required ( KershawDesigns.com offers this service for it's upgraded motors if you aren't able or confident ), standard 550-650 sized motors can use the standard 3906 motor mount as they are the same diameter & use the same standard 25mm mounting pattern, though larger 700+ class motors will require a custom motor mount due to larger diameter & larger mounting pattern ( KershawDesigns.com also sells suitable motor mounts for all their motors, or it is possible to modify the stock 3906 mount, or even build your own by using the stock mount as a template ). The current motor upgrade options KershawDesigns sells are listed below, in order of power/speed improvement ( least to most ): 550-820 sized motor upgrades Motor mounts for larger motors 700-HO motor kit 820 Motor kit
The current drill motor upgrade options you will likely encounter are listed below, in order of power/speed improvement ( least to most again ): HPI GT550 Motor BaneBot RS550 Motor Johnson Motors Dewalt 14.4V Motor Part# 396505-21 Dewalt 12V Motor Part# 396505-20
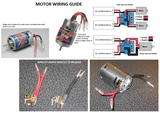
If purchasing a motor or motors and wishing to perform the rewiring yourself, please be aware that the motor wires coming from the esc ( 2 red, 2 black ) are wired in parallel, meaning that they both receive the same voltage & current from the esc & batteries, so you can wire the motors to either pair of red and black wires without worrying about which red wire & which black wire go together as a pair- it really doesn't matter at all. Below is very helpful thread & a simple diagram to show the correct wiring sequence between esc & motors, along with some photos to show how the wires should be attached to the motors, or motor if using only one: Dewalt Motor Installation Guide ( NB: installation is performed on an Erevo, but same principles apply ) Dewalt Motor Installation Guide ( NB: installation is performed on an Emaxx 3903 )
You will notice the standard Titan motors use bullet connectors to connect to the esc wires- these are standard automotive bullet connectors which can be found easily online or at your local garage or hardware store; you can also replace/upgrade these bullets in favour of some Deans connectors, or something like 3mm gold-plated bullet connectors for a better connection and improved current flow. This will also allow you to remove the motors more easily for cleaning or testing etc. Finally, you will more than likely need to adjust your truck's gearing to account for the new motors being faster, slower or producing more torque; as a rule of thumb, I would begin with stock gearing or maybe slightly lower ( 16/68 for argument's sake since Traxxas has changed the stock gearing several times over the years ), then gear up as motor, esc & battery temperatures allow, though KershawDesigns offers different gearing solutions to suit the much larger diameter motors they sell. Ideally, your esc and motor will run at roughly the same temp, but will not exceed about 160-180*F, with nimh batteries somewhere in that temperature region also; lipo batteries should never exceed 140*F, ideally 100-120*F. This old trick still holds true as a last resort- if you can't hold your finger on an item for more than 3 seconds, then it is too hot and should be allowed to cool down ( lower gearing will help, as will smaller diameter & lighter tires- stock Emaxx 3906 tires are 5.75" tall, newer Emaxx tires are 5.9-6.3" tall ). 7. V-twin concept One setup you may have seen or heard about is the 'V-twin', which uses a pair of Traxxas VXL escs and 3500kv motors. However, this setup is no more powerful or fast compared to a decent 1/8 scale BL system using a single esc and motor. Be that as it may, it is quite an impressive looking setup to have installed on your Emaxx and is quite simple to achieve. All that is required is a pair of Traxxas VXL systems, a servo Y-harness ( to join both escs to the single throttle slot on the receiver ), some suitable sized pinions ( must be the same tooth count ) and a little effort. Bolt both motors to the transmission, and connect the escs to the receiver ( rx ) throttle channel via the servo Y-harness. Then, programme the two escs at the same time to your radio, and that's it. For an indepth guide please click the link below- the build is based around a new Emaxx but the exact same principles still apply for the old 3906 Emaxx: V-twin Build Guide
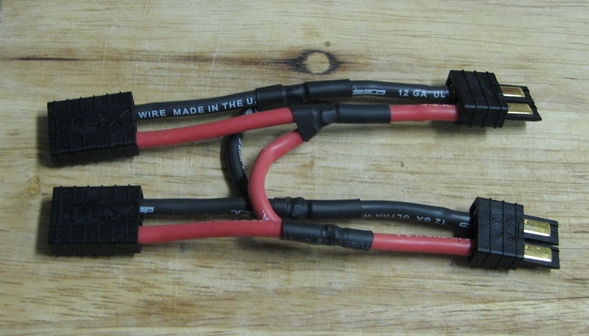
Ensure the mesh is set correctly between the spur and both pinions- use a piece of paper between the spur and pinion as you mesh them together, to prevent them binding too tightly. To get the best performance from a V-twin it is vital to use good batteries, this generally means a pair of 2s ( 7.4v ) or 3s ( 11.1v ) lipos. To ensure even discharging on each system, it is a nice idea to use a parallel harness. It essentially is a pair of leads with male plugs at one end, and female at the other, with a wire linking the negative wire on each lead, and the positive leads in the same way. This ensures that the batteries discharge at the same rate, preventing the LVC from kicking in on either system before the other- see below:
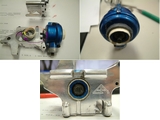
Topspeed is around 40-45mph with 2x2s lipos, or 55-60mph with 2x3s lipos and careful gearing, though it is important to keep a close eye on motor, esc and battery temps. 8. Radio System If your truck as been in storage for a long time then chances are it still has the original 27mhz AM radio, or if it was bought used then it may have no radio at all. Either way, you will be needing to upgrade to something much more reliable ( no glitching ) and with far better range, plus no silly crystals to keep changing; you need a 2.4ghz radio system. 2.4ghz systems use a much higher frequency band and constantly change channels automatically to avoid interference with/from other r/c users in the area- glitching is pretty much a thing of the past, as too are giant long aerials and antennas on the tx and rx ( transmitter & receiver ). Initial setup is slightly more complicated as the rx must be 'bound' to the tx so that it will only accept input from that radio transmitter; once it is bound though, it will stay bound forever ( baring any funky electrical issues ) allowing you to concentrate on driving and not having to worry about loose crystals or other r/c drivers being on the same channel as you. Your budget and feature-set requirement will determine which radio is right for you, there will never be a 'best radio' which everyone will be happy with of course, but I can try to point you in the right direction at least: FlySky TX/RX combos at BangGood.com The 2 channel FlySky systems are excellent entry level radios with great range and several degrees of adjustability, but lack the advanced features and ergonomics of more expensive models, such as multi-model memory and EPA settings or LCD displays etc. Still, much better than the stock Traxxas radio. The 3 channel FlySky GTB3B has revolutionized the low-budget r/c radio market by offering quite an advanced feature set on an extremely cheap radio. Spektrum Surface radios Spektrum are a high end radio manufacturer with a large line up of 2 & 3 channel radios to suit most needs and budgets. The DX3e is the budget model without an LCD screen but still is quite adjustable, the DX3c is a step up with a side-mounted screen & 20 model memory. The DX3s has a rear facing screen and advanced telemetry features, where as the DX3r has a greater model memory and even more features. The DX3r is the most advanced model Spektrum sell and is highly coveted by serious racers;- the lower end radios will be fine for most bashers needs.. Futaba Surface radios Futaba have good range of radios too, with varying features suitable for most budgets. Turnigy radios Turnigy are manufacturers of some fine radios as well as Lipo batteries, with a wide range of options to suit most needs and budgets. 'Orange' radios Hobbyking have their own in-house brand of popular 'Orange' radios that are clones of various Spektrum radios and receivers- at a much lower price which makes them very tempting for budget-minded users who might want multiple receivers for all of their models without breaking the bank so to speak. FrySky radios FrySky have been around for a few years now and have a massive following due to their feature-rich and affordable radio systems, very much liked by all parts of the r/c hobby. 9. Steering mechanism The stock 3906 mechanism is fine essentially, the only real weak points being the weak steering servo, and the weak servo saver. With either the stock 3906 chassis or an after-market version, it is best to opt for a single, powerful servo rather than a pair of weaker servos- this will result in much less hassle trying to stop the servos fighting eachother & also save some weight & slop in the steering. When looking at a new servo, try to aim for something with over 250oz/in of torque, digital, with metal gears to ensure it will be more robust. A quick servo is also just as important as a strong one so a response time of less than .25seconds/ 60 degrees is good, less than .15 is excellent ( options below range from 'not bad' to 'awesome', in sequence ): 60G EXI Digital Coreless Servo-D226F w/ Metal Gear Power HD HD-1501MG Power HD HD-9150MG Hobbico CS-170 Std Digital Ultra Torq Savox SC-1256TG Standard Digital "High Torque" Titanium Gear Servo Spektrum A6030 Digital Ultra Hi-Torque Titanium Gear Hitec HS-7955TG Futuba S9156 Servo If you would prefer to find your own options however, bearing in mind the minimum ideal specification required, then feel free to browse this excellent resource: The Servo Database Note: The hobbico servo is the same spec as the hitec servo linked too, but a bit cheaper. The savox servo is what I happen to use and it is very good value given its spec & pedigree. The Power HD & EXI servo are budget models but have some very good feedback- worth a look for sure. With the servo saver, the upgrade path can be made much simpler; I suggest a Kimbrough large truck model or similar to replace the weak stock saver which is attached directly to the servo's output shaft: Kimbrough Large Heavy Duty Servo Saver Kimbrough Large Extra Strong Servo Saver You can also replace the bellcrank mechanism itself with an aftermarket version for a little extra strength vs the plastic stock version: Integy aluminum steering bellcrank assembly It is also possible to retrofit the complete bellcrank servo saver mechanism from the new model Emaxx onto the old 3906 chassis with very little or no modification required- again, ebay will be the best place to find a complete mechanism with a little effort:
This modification works best when used with a single hi-torque digital servo, preferably with metal gears ( see above for recommendations ). 10. Batteries Nimh Batteries TL;DR- NIMH BATTERIES SUCK, USE LIPOS The best way to get good performance from any Emaxx is to use good batteries, as these ultimately determine your runtime and the amount of punch & top-speed your truck will have. When choosing packs, consider the amount of capacity they have in mah (Milli-amp Hours), the cell count/voltage, and the discharge rating if available. Higher mah will mean longer runtime, higher voltage will mean greater topspeed, and a higher discharge rate will mean more punch along with more consistent topspeed and acceleration. There are a great many brands out there, so choosing the best for your needs is somewhat tricky sometimes. In general, try to avoid cheap 6 cell shotgun or stick packs form Ebay, as these are assembled using thin tin strips to join the cells. Good quality brands are IB, EP and ENER-G, though there are many others. It is important not to overheat any battery, or to miss-treat it, as this can lead to ruptured cells or blown endcaps. Be sure to observe the correct polarity when building packs from scratch or adding cells to packs. Mild BL systems such as the HvMaxx/pro will run well on 12/14 nimh cells, but does much better on 2x 2s lipo; therefore I recommend the use of Lipo batteries with an BL powered model to get the best results & enjoyment possible, even if it means a little extra expenditure.
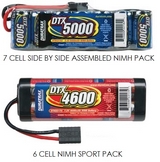
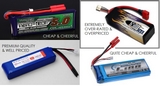
Of special note is the fact that CastleCreations does not recommend the use of nimh batteries with the MambaMonster system, however the BL Edition Emaxx 3908 is provided with a pair of 7 cell 3300mah packs to help you get going; when using the MMM system in any Emaxx ( including nitro conversions ) restrict your gearing to the stock/equivalent of 17/68 if you plan to use nimh packs. For better results, use some higher quality side by side assembled ~4000mah nimh packs, or even 3x 6 cell packs in series ( total of 18 cells ), then you will be able to achieve 35-40mph without the esc suffering from ripple current due to insufficient battery power. This ofcourse will require a special series harness for 2 batteries to be used on one of the esc's battery connectors, and some form of mount for the extra battery to fix it across the rear of the chassis; hence why lipo or A123 batteries will be the best choice to get the most performance from your 3908 emaxx. Lipo and A123 batteries Lipo = lithium polymer. They have a nominal (resting) voltage of 3.7v per cell, and a fully charged voltage of 4.2v. When charging, and discharging ( running them in a vehicle ), the individual cells in a pack can become out of balance. This means in a 2s pack for example (s = cells in series), one cell can read slightly higher or lower than the other, and over time this difference can become large enough to mean that one cell becomes over-discharged during use; it is important not to discharge them below 3.0v per cell, but 3.2-3.4v is a safer level. This is where the LVC device mentioned earlier in the guide comes into play, as it cuts the throttle or sounds an alarm ( buzzer & LEDs usually ) when the cells have drained down to whatever the cut-off voltage is set to. Some LVCs have adjustable voltage settings, and cutoff type (reduced power, warning light, warning buzzer, total shut-off etc), depending on the exact design & method of installation; you wouldn't want to loose all power with a plane or heli for example so an audio alarm is much better. Most modern BL escs will have a built-in & adjustable LVC device, but check their description and manual to make certain. When charging lipos, the balancer device is used to keep the voltage equal in all the cells of a pack- it can be balancer that works along with the charger, separate from the charger, or you charge through the balancer. The end result is the same though- cells with a lower voltage get a longer charge, whilst cells with a higher voltage get drained a little to keep them in line with the others. This is what the little white plug is for that you see sticking out of lipos cell packs, it is the balancing plug/tap. The lipos battery chemistry requires a special technique, called the CC/CV method (constant current/constant voltage). Basically, the charger will pump in a high current (amps) until the cells reach ~4.2v, then it will drop the current but maintain the voltage level until the cells reach and stay at 4.2v, at which point they are fully charged. Over charging is very dangerous, as lipo cells contain a lot of energy, and overheating them can be a serious fire-hazard, hence the items called 'lipo sacks' that should be used to contain any possible damage caused by a burning lipo. The chances of that are rare these days though, and only idiots on youtube tend to burn up lipos for fun. Lastly, the C rating thing. This refers to a lipos maximum discharge rating, and is a multiple of its capacity. For example: A 20c 5000mah pack can put out 100amps ( 20 x 5amps = 100amps, where 1amp = 1000mah ). A 10c 8000mah pack can put out 80amps ( 10 x 8amps = 80amps, and so on ). Choosing the right capacity and C rating is important for any given application, and should be based on how many amps your chosen motor can draw at maximum load. For example, the feigao XL motors tend to draw about 80-100amps at peak current levels, so you should select a battery that can supply at least 80amps continuous. Generally though, the motors pull a continuous current of about 10-20amps or thereabouts, so the battery wont see very high drain rates for the whole run, otherwise it would soon over-heat and 'puff'. Once a battery puffs, its pretty much toast, though individual cells that are still okay can be salvaged- a 5s lipo can be reconfigured into a smaller pack of 4s etc. It is worth noting though that high mah capacity lipos with a low C rating at not as capable at discharging large amounts of current compared to a smaller capacity lipo with a higher C rating, this is because the voltage level droops heavily under a high load, due to the lipos low tolerance to high current draw; a higher C rating is always preferable regardless of the packs actual capacity.
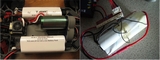
A123 cells have a very high energy density like Lipo cells, but are inherently safer and 99% indestructible, so do not have to be used with an LVC (low voltage cut-off) device, and can be charged much quicker given the correct equipment is used. Their resting voltage is 3.4v, which makes a 5s configuration ideal for most applications that would normally use 12~14 Nimh cells, or 4s lipo. The downside is that they are limited to 2300mah or so of capacity, so ideally should be ran in a parallel formation such as 5s2p (2 five cell packs connected in parallel to double the Mah capacity but maintain the same voltage as 5 cells). They can be purchased easily by buying a Dewalt 36v battery pack on Ebay, and then following one of the online tutorials which demonstrate how to turn them into RC packs. A new generation of prismatic LifePo4 (A123 chemistry) cells are currently hitting the market. These offer all the benefits of lipo cells in terms of power density and weight/size, but also have the benefit of safer chemistry, faster charge rates, no LVC required and capable of very high current output without puffing or swelling. Currently there are only a handful of vendors for these new batteries; MaxAmps, HobbyKing/HobbyCity, and Protek being then main noteable sources, though given the extortionate mark-up that MaxAmps charges (to pay for all its advertising and sponsorships no-doubt) I would stay clear of them until their prices drop inline with the competition... if they drop that is. There are other similar cells on the market, but most are low discharge, high capacity packs, unsuitable for R/C use. Time will tell on this type of battery, but if other companies start making and selling them for the R/C market, things will be alot brighter.
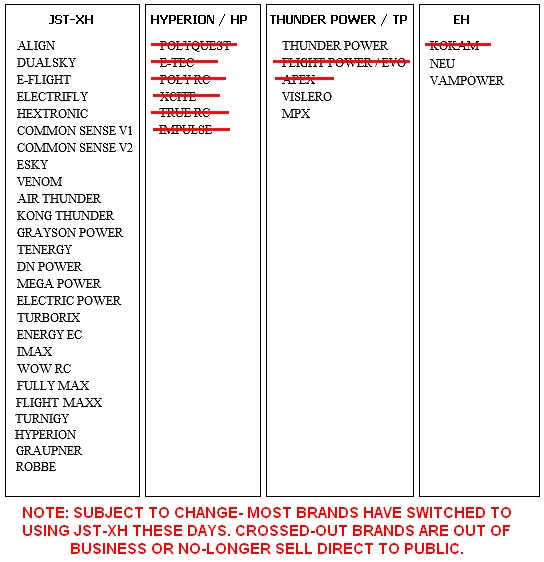
It is very important when choosing lipos to select items with a good specification & that will provide sufficient current for the MMM to operate properly. The esc requires lipos capable of producing at least 120amps continuously, though the more overhead you have, the longer the batteries will live for and the longer your runtime will be ( as an indirect effect the voltage will not drop below the Low Voltage Cutoff ( LVC ) until nearer to the end of the discharge ). To determine how much current your lipos will produce, simply multiply the C rating by the mah capacity & devide by 1000, for example: 20c x 5000mah / 1000 = 100amps, or 40c x 5000mah / 1000 = 200amps. For best results the lipos should be of identical specifications & age/ discharges, though it is perfectly fine to use two different voltage/ cell counts in series, such as a 3s & 2s lipo to achieve 5s lipo ( I like 5s lipo as it is the perfect mix of power and speed when geared for about 40mph ). The MMM esc has numerous programming options & settings that are accessible via the 'CastleLink' programmer. This unit plugs into the rx lead from the esc & connects to a PC to allow changes to be made to various settings such as punch & torque control, LVC settings, timing and start power, brake strength and also throttle curves etc etc; it is usually an optional extra costing approximately $25; well worth purchasing. Please see new Castlelink page for indepth info on how to use this device and the best settings: CASTLE LINK GUIDE Please refer to the Tutorials page for a more indepth explanation of Lipo selection, Lipo chargers & charger operation: TUTORIALS 11. Chargers and balancers Its important to choose a good battery charger that is suitable for charging your type of batteries. Do not go too cheap, as you will inevitably want to upgrade to a better & faster charger in a short space of time. Ideally, you will buy a charger that can handle both lithium based and Nimh cells, that way you are ready for a lipo or A123 upgrade in the future without having to buy a new charger. A good charger will allow you to charge upto 14 cells or 6s lipo, and charge at a 1c rate or higher (1c = batteries mah capacity, 1amp = 1000mah for example). This is important as some chargers have a lower wattage rating than others, and therefore must lower their charge current (in amps) when charging a high voltage battery pack, in order to stay within that wattage rating, EG: A 50watt charger will drop to around 3.5amps when charging a 4s (14.8v) lipo 4000mah pack. To workout how powerful your charger needs to be to charge a pack at 1c, simply multiply the fully charged voltage of your biggest pack, say 6s lipo (25.2v) by its capacity in amps, say 5amps (5000mah), which gives you 126watts. You will therefore need a charger that is rated for about 130watts or more, though generally speaking 50-100watts is more the norm that you will find in terms of mains powered chargers. If your charger is a DC-only type, it will need a power supply that is capable of outputting sufficient amps to power the charger, same rules apply as before basically when looking at power supply specs. An old PC is a good source for a good strong power supply, though it will require some modifications to serve its new function- a quick google search should yield good results for tutorials- for less experienced r/c modellers there are plenty of off-the-shelf options. Finally are balancers, which were covered before in section 16, but there is a little more to add. When choosing lipo or A123 battery packs with balance taps, it is important to consider the type of tap they come fitted with, as there are a dozen or so different brands/styles, and you may need to find a suitable adaptor so that your lipo battery can be balanced by your balancer. My advice is to choose the most common brand of tap when you are given the option (some stores allow you to choose the brand of tap you want fitted to your packs), and always choose that type whenever you buy new batteries (see below for a compatibility chart). See below for a handy Lipo Balancer compatibility chart which lists the 4 main types/ styles of balancer connector along with all the brands of lipo battery that use each type:
Please refer to the Tutorials page for a more indepth explanation of Lipo chargers & charger operation: TUTORIALS 12. Miscellaneous Upgrades Besides the upgrades already covered, there are various other parts of the truck that are prone to breaking if you are a particularly hardcore or bad/inexperienced driver; these weaknesses are present in most Maxx-based trucks. Below is a brief ( ish.. ) summary of the parts that you may feel the need to upgrade rather than simply replacing with more stock parts- a full list of retailers can be found on the Useful Links page. Bulkheads The stock bulkheads are a well known weak link, and are prone to breaking in a head-on crash, or from a heavy landing or cartwheel. Traxxas and many after market companies sell aluminium upgrades, the trick is knowing which ones to avoid. Integy are a company well known for their shiny upgrade parts, but the quality is somewhat hit and miss- the latest versions of their bulkheads are hopefully an improvement over their older parts, but generally they are only good for a light duty or display quality vehicle. Garc, FLM, HCR, NewEra and a great many others sell perfectly good quality bulkheads that will fit the Maxx range perfectly, although it has been said the Garc bulks require a little effort, as too with the FLM bulks in a minority of cases. Try to avoid bulkheads that have been hollowed out alot, as this weakens them. Shocktowers The basic design of the towers hasn't changed much between the 3906 Emaxx & newer models, of note primarily is that the older Emaxx uses round body posts and there is less bracing on the tower itself. The new truck uses I-beam shaped body posts that are much stronger and resistant to braking in a crash or flip etc. The shocktowers are known to snap in these upside-down-truck situations, and the quick fix is to use some zip-ties to hold the broken halves together. A more long term solution is upgrade to either RPM towers, or to aluminium aftermarket brands. Personal choice will dictate your route, however try to avoid metal body posts and towers, and use Integy towers at your own risk; some have luck, some don't. Low profile towers are good for racing setups to lower the CoG ( Center of Gravity ), though you will need shorter shocks ideally. FLM and UE sell towers with multiple mounting positions for the shocks, allowing much more fine tuning over the stock towers, and the RPM towers that only have one upper mounting position. Knuckles & suspension The stock items are generally fine, though they do use rather small bearings to support the stub-axles. Numerous after market companies sell suitable upgrades, though they tend to use the smaller bearings still. The best upgrade is to use the new Emaxx style knuckles & driveshafts as mentioned earlier. You cannot use newer style driveshafts or CVDs with the older style of knuckle. UE sell a very nice design of knuckle and suspension known as RacerX for the rear of the truck, and some advanced geometry is used in their extended suspension arms. RPM also sell a new design of rear suspension arms for Maxx trucks that eliminates the turn buckles( True-Trac suspension )- these use new style driveshafts ( use a longer screw and nyloc nut when mounting the shocks as RPM plastic is quite flexible and can cause the screws to strip out more easily from teh suspension arms ). The stock suspension arms are pretty sound, but RPM offer some nice upgrade items that are almost unbreakable. Of course, there are also numerous aluminium options too, it is a matter of personal taste as to which route you take, though RPM arms are very robust and ideal for people who are hard on their trucks. Shock Absorbers One of the most import areas on any vehicle is the suspension, which determines how well the truck handles. And by handling, I mean accelerating from a stand still, turning through corners at speed,and landing from jumps etc. In order to do all these things well, it is worth investing in a good set of shocks, and a full set of springs if available, plus various weights of shock oil. There are many different shocks available, but I will just cover the main, most popular ones: *Bigbore shocks *Power strokes *Pigback shocks Bigbore shocks dont come as standard with the New E-maxx (or old E-maxx), but they are an optional upgrade available separately; well worth the investment over the stock 'Ultra shocks'. Having a larger bore allows them to hold a larger volume of oil, which inturn produces a smoother shock absorbing action. The down side is the top cap is known to 'blow-off' when landing some very large jumps, but that is hardly suprising & the solution is to fit stiffer springs. Powerstroke shocks are sold by Proline, and are a very popular upgrade among racers and bashers alike. The advantage of these is there tunability, which is much greater than Bigbores, and they also use a more advanced sytem of springs to absorb small & large bumps (dual rate springs). Piggy back shocks are simialr to ordinary shocks, though they have a small external reservoir linked to the main body of the shock which holds extra oil, thus allowing for extra dampening action. Beyond this there are alloy shocks which are much more robust, but also generally much more expensive, and also shocks with threaded bodies, which allow for an even greater degree of tuning. As a general rule, the thicker the oil you use in the shocks, the slower the damping action (which is good for jumping), so the softer the springs should be, and viceverser for thinner shock oil. Skid plates The stock skids do a good job of protecting the underside of the truck, but the front and rear skids also work to tie the bulkheads and chassis braces together, and a stronger material than plastic is required ideally ( the mild-steel brace between the skid and the bulks does very little for rigidity ). Aluminium skids are good, but they tend to bend rather than flex in a crash; FLM aluminium skidplates are quite sturdy it must be said though- using those in conjunction with some RPM bumpers would protect the front end from damage in all but the worst head-on crashes. Titanium (Ti) skids such as those sold by Garc, HCR and now NewEra are much better, and will add much needed strength in critical areas; sadly HCR ( HardCore Racing ) no longer sell R/C parts, GARC havent had any new stock or updated their website for several years, and NewEra Racing only seem top have rear Ti skids in stock so watching ebay is advised. There is no centre skid on the old truck, but many companies offer them- any material is fine as it wont be subjected to too much damage, only minor scratching. The new truck comes with a nice centre skid, though NewEra sells a nice aluminium version too. RPM sell some very nice wear plates for the older truck that protect the existing skids from alot of damage- there is also a version/ set for the new Emaxx too. Wheels and tires The old 3906 Emaxx setup uses a 14mm hex to mount the wheels onto the stub-axles. After market hexes and adaptors allow you to use anything between 12 and 23mm- 17mm and 23mm being the most common generally. The advantage here is that a larger hex diameter is less prone to stripping out inside the wheel- you will obviously require a wheel (or rim) that uses the same size hex as the one on the truck. For general use the stock chevron design tire is fine, though there are much better choices for onroad and offroad use, depending on the specific surface (hard dirt, loose soil, grass, tarmac etc). Proline, GRP, Maximizer are but a few of the aftermarket companies offering wheels, tires and hexes. Under BL power and high rpms many tires tend to balloon in diameter, which can cuase them to tear or fly apart, or at the very least cause loss of control. One solution is to use tire foams, and another is to belt the inside of the tire with thick duct tape (turn the tire inside out and run a couple of strips of tape around the tire, being careful not to overlap the edges which would cause imbalance). The 3908 uses special 17mm hexes to withstand the torque of the MMM system. These hexes have a unique design to them with what are essentially teeth on each side of the hex; these match the hex pattern on the 3.8" rims that comes with the truck. This does mean however that if you wish to use aftermarket 17mm hexes with the stock rims then you will need to file away the teeth from inside the hex on the rims. The tyres on the 3098 are a massive 6.3" in diameter, the same as used on the latest revo & t-maxx 3.3 trucks; taping the insides is highly recommended to reduce ballooning that can lead to exploded tyres at high speed. BodyShells The old 3906 truck has a wheelbase which is suited to a wide range of after market shells, including a great many nitro model shells too which will fit in place almost perfectly with very little effort. If a shell is quoted as fitting the Emaxx 3906, or T-maxx .15 then it should be a direct fit, and this goes for shells intended for trucks such as the HPI Savage ( earler models with a shorter wheelbase ) too. Comparing wheelbases ( distance between the front and rear axles ) is a guaranteed method of checking a shell will look 'right' when installed as a large overhang at the front of rear should be avoided. Brands such as HPI, ProLine racing & Parma PSE sell many great themed & replica shells, as do various other vendors that can be found with a seach for 'r/c truck bodies'- there are also many online stores selling custom painted shells if you want something a bit special. For more technical information and 'How-to' guides regarding the E-Maxx trucks and Batteries etc, please visit the Useful links page, Tutorials page & Emaxx FAQ page.
|
|